Multi-Factor Authentication FAQs
We have assembled answers to the the most frequently asked questions about Multi-Factor Authentication.
MFA is a reliable method of adding greater security to an online account. It works by requiring users to enter an additional single-use code during the login process. The inclusion of this code ensures that it is you logging in because only you should have access to your authenticator.
Here are some reasons to set up MFA on your account:
- Provides more layers of security than a single password login.
- Helps assure consumer identity.
- Adds next-level security, even remotely.
- Meets regulatory compliances.
- It's easy to implement.
An Authentication code can be sent in many ways.
Our site uses:
- Google Authenticator
- Microsoft Authenticator
Your account is set to not use an Authenticator by default. You will need to select any other Authenticator option yourself to configure your personal Authenticator and verify receipt of the initial one-time code.
Even after you set up an Authenticator, you have the option to turn it off.
The steps to turn off MFA are fairly easy:
-
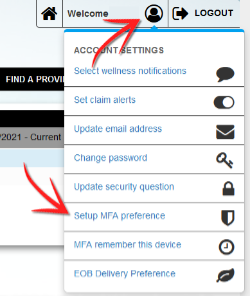
Visit the 'Setup MFA Preferences' page under your account menu.
-
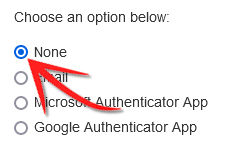
Select 'None' in the 'Select Authenticator Method' box.
-
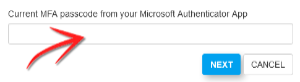
Enter your Current MFA Passcode in the box. (Field label may be different depending on your current MFA option.)
- Click 'Next'.
- Your Multi-Factor Authentication has been turned off.
Please note that if MFA is required on your account, 'None' will no longer be an available option.
If 'None' is your selected option when MFA becomes required, it will be disabled and can't be selected again.
After you switch to a valid MFA option, you will no longer see the 'None' option listed.
Email is an easy way to set up an Authenticator on our system. It is set to use the email on file for your account.
Before setting up email Authentication, please verify that the correct email is in your account. You can check this in the Account menu under 'Update email address'.
After you have confirmed we have the correct email, the next steps are:
-
Visit the 'Setup MFA Preferences' page under your account menu.
-
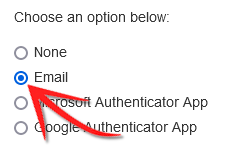
Select 'Email' in the 'Select Authenticator Method' box.
-
Enter your Account Password if no Authenticator is currently selected. If switching from a different Authenticator Method, enter the prompted information in the box.
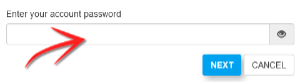
- Click 'Next'.
-
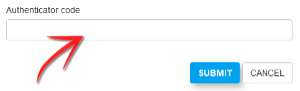
You will receive an Authenticator code in your email. Please enter it in the box on the next screen and click 'Submit'.
- You have successfully set up Email as your new Authenticator Method.
The Microsoft Authenticator App is a popular and easy to configure MFA option. If you do not have it installed, it is available on your mobile device for free from the Apple App Store or Google Play.
Once you have the app installed, please follow these steps:
-
Visit the 'Setup MFA Preferences' page under your account menu.
-
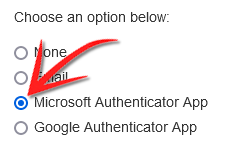
Select 'Microsoft Authenticator App' in the 'Select Authenticator Method' box.
-
Enter your Account Password if no Authenticator is currently selected. If switching from a different Authenticator Method, enter the prompted information in the box.
- Click 'Next'.
-
Open your Microsoft Authenticator App, click the three dots in the upper right corner and select '+ Add account'.

- Select 'Personal account' and 'Scan a QR code'.
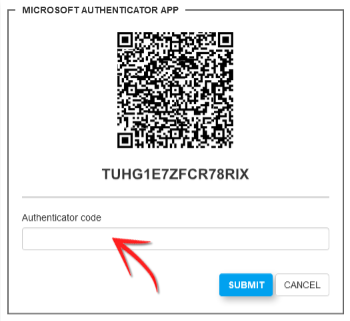
- Using your mobile device, scan the QR code shown on your computer screen.
-
Select the new account created in the Microsoft Authenticator App and enter the new passcode in the field under the QR code on our website and click 'Submit'.
- You have successfully set up the Microsoft Authenticator App as your new Authenticator Method.
The Google Authenticator App is a popular and easy to configure MFA option. If you do not have it installed, it is available on your mobile device for free from the Apple App Store or Google Play.
Once you have the app installed, please follow these steps:
-
Visit the 'Setup MFA Preferences' page under your account menu.
-
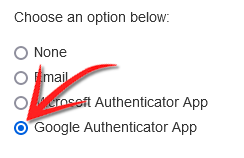
Select 'Google Authenticator App' in the 'Select Authenticator Method' box.
-
Enter your Account Password if no Authenticator is currently selected. If switching from a different Authenticator Method, enter the prompted information in the box.
- Click 'Next'.
-
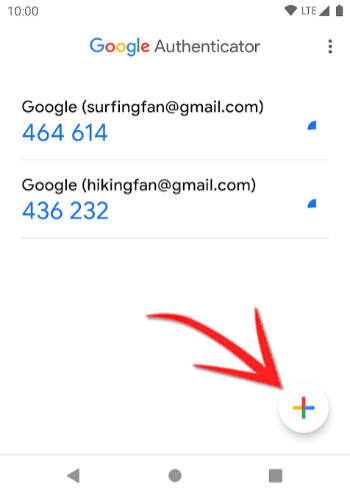
Open your Google Authenticator App, click the plus sign in the lower right corner. You can then choose to 'Scan a QR code' (recommended) or manually enter the code provided on the screen.
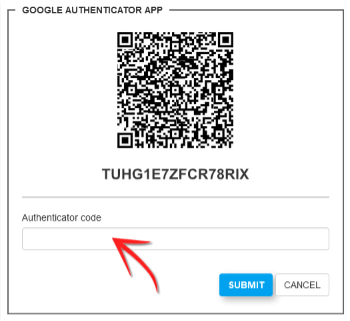
- Using your mobile device, scan the QR code shown on your computer screen.
-
Your Google Authenticator will now show our site in the list of available passcodes. Enter the new passcode in the field under the QR code on our website and click 'Submit'.
- You have successfully set up the Google Authenticator App as your new Authenticator Method.
The next time you login to our website you will be presented with the same username and password form as before. After you successfully enter your credentials, you will see an additional screen asking you to enter your new MFA passcode. MFA passcodes are time sensitive and generated as needed. Simply open your selected Authenticator app to retrieve the current passcode or click the 'send passcode by email' button if email is your MFA preference.
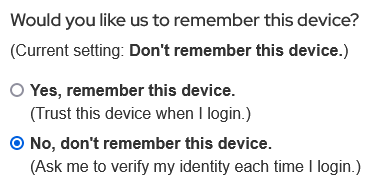
During the login process when you are presented with the screen asking you to enter your new MFA passcode, you will also be presented with the option to remember the current device you are using to access our site. If you are on a secure computer you own, feel free to change the prompt to 'Yes, remember this device'. You will then not be prompted to enter your MFA on this device only for the next 30 days.
You can also change this setting at any time by visiting the Authenticator preferences section of our website.
You can choose to remember the current device so you won't be prompted to enter your MFA passcode for 30 days or forget the device so you will be prompted for your MFA passcode the next time you login.
Your MFA Authenticator preferences can be changed at any time. They are available in the 'Setup MFA Preferences' page under your account menu.
Once you are on this page, follow the instructions for the new Authenticator method you would like to start using.
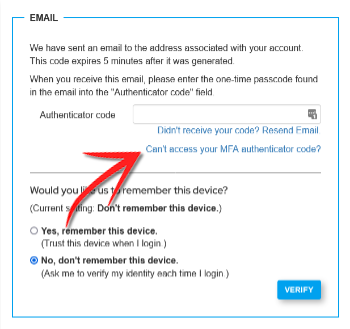
Don't worry, you can still get access to your account if you can't access your current MFA Authenticator method. (An example might be if your mobile device has been lost or stolen, or if you no longer have access to the email address used when MFA was set up.)
When presented with the MFA Authenticator Code screen, just click the 'Can't access your MFA Authenticator code?' link found under the code field.
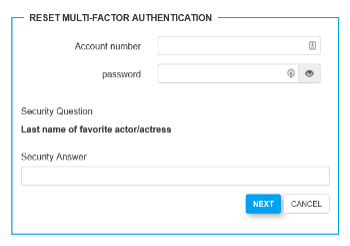
The 'Reset Multi-Factor Authentication' page will prompt you again for your username and password, but this time will also ask you to select and answer the security question you created when you set up your account. Successfully answering this question will turn off MFA on your account and allow you to set up a new MFA Authenticator method.
If you do not receive your MFA email, please check your spam folder to ensure it wasn't routed to that folder by mistake. It can also sometimes take a few minutes to arrive.
If you don't receive your email and need immediate access to your account you can click on "Can't access your MFA authenticator code?".
If you encounter an issue with using your authenticator app that is not addressed on this page, please visit the link below for some useful tips on using Microsoft Authenticator.
If you encounter an issue with using your authenticator app that is not addressed on this page, please visit the link below for some useful tips on using Google Authenticator.
You will only see a Grace Period message if your account is required to use Multi-Factor Authentication on our website. Once MFA is required, you will have a set period of time to access your information without MFA before you will be required to implement MFA on your account.
Depending on your account's rules, this Grace Period can take several different forms. The types of Grace Period are:
- Number of logins remaining since last login: This is the number of times you can login to your account before MFA will be required. Depending on how frequently you login, it may take you weeks to deplete that number or you may login that many times in a single day.
- Number of days remaining since last login: This Grace Period starts after your first login once MFA is required for your account. The number of days remaining will be shown each time you login. You can login without MFA as many times during this period as you like, but will be required to set up MFA before those days have passed.
- MFA required effective date: A set calendar day has been established for your account. We will show this to you as the number of days remaining before MFA is required. Any login after the specified number of days will require MFA to be set up.
Please note that after your Grace Period has expired, you will be required to set up MFA in order to access any of the information in your account.
You will see this message if your account is required to use Multi-Factor Authentication on our website, your Grace Period has expired, and you have not set up MFA.
In order to acces you account, you will need to follow the steps in the other FAQs on this page to configure your choice of MFA on your account.
If you still need assistance after reviewing the FAQs above, please feel free to reach out to our Support Team at MFAHelp@alliedbenefit.com.